| Materials | Tools | |
|
|
Cockburn Cement supply a range of cement products, in different package sizes, to cater for a variety of DIY projects.
We have listed our quality products that may best suit your concreting needs. For estimating your requirements please refer to our easy estimator or try our calculator located in the side panel.
Check out our Home Builders Guide where we have listed the best products available in WA and where to use them for the best result.
Please see below for our step-by-step guide for laying concrete footing; alternatively you can download our printable copy here:
![]()
-
1
Setting out a brickwork footing
A concrete footing should be 100mm deep by 300mm wide if the footing is for a free standing wall. The footing should be increased to 150mm deep and 450mm wide if the wall being built is a retaining wall. For larger retaining walls an engineer may need to be approached for advice.
Firstly mark out the position of the footing with pegs and a string line. Dig a shallow trench to the required depth of the footing and drive the pegs into the ground along the line of the trench. The tops of the pegs should be set level to indicate where the finished surface of the footing is to be. A spirit level along the top of adjoining pegs will show whether the pegs are in fact level.

-
2
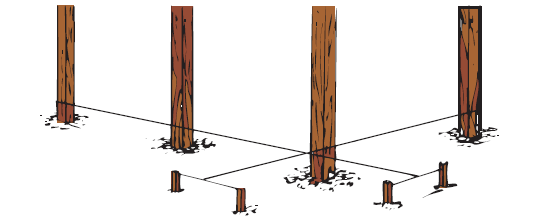
Setting out posts for pergolas and fences
First you need to establish where your first and last post will be and then the distance between the remaining posts. Check each post for height, then line and plumb using string lines and spirit levels as shown in diagram below.
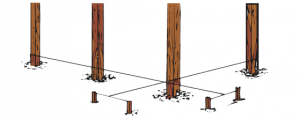
The depth will depend on the length of the post, normally one third of the post length must go into the footing, with a minimum footing depth of 230mm. The footing diameter should be three times the diameter of the post being placed.
Place each post into a hole and wedge them into position. Check the posts are the right height and are plumb and in line with the other posts.
-
3
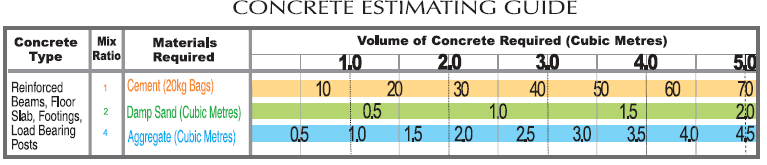
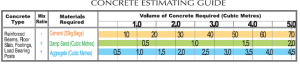
Concrete requirements for large jobs
Calculate the volume of your footing by multiplying the footing length x width x depth. This will give you a quantity of concrete in m3.
Cement to be used should be Cockburn Cement Type GP only, as other cement products may contain lime which is not acceptable for concreting applications such as this.
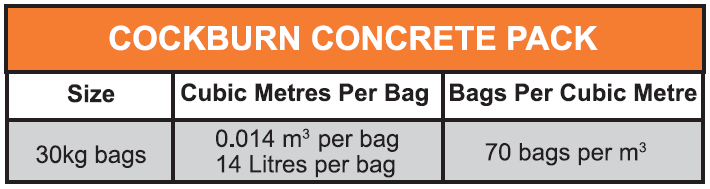
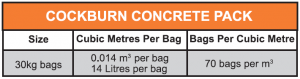
For small jobs use Cockburn General Purpose Concrete pack.
Cockburn’s pre-blended range already contains cement, sand and aggregate.
-
4
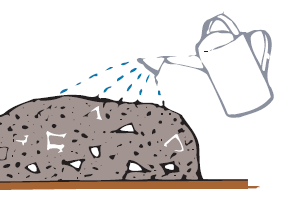
Mixing the concrete
Concrete needs to be mixed on a clean hard surface, such
as an existing concrete slab or on a piece of board. You can also use a cement mixer if available. Firstly place your measured quantity of sand and add the correct proportion of cement. Mix these materials thoroughly until the colour is consistent.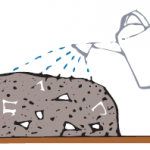
Add the coarse aggregate, mix all three ingredients thoroughly again until the colour is consistent. Finally add your measured quantity of water, sprinkle the water slowly over the mix, stopping frequently to turn over the mix until the mix is consistent in colour and texture. Do not add too much water, you do not want your mix too sloppy.
Too much water means a weak concrete. The water should weigh roughly half of that of the cement added.
A concrete mix of 1 part cement : 2 parts sand : 4 parts coarse aggregate (by volume) should be used for footings.
-
5
Placing the concrete
Concrete must be placed within half an hour of mixing.
Brickwork – Place your concrete into your trench. Work the concrete into awkward places and corners using a shovel. Place enough concrete to overfill the formwork slightly. Take your wooden float and compact the concrete by drawing the float firmly across the concrete surface. Use a straight edge to spread the excess concrete using a sawing motion levelling the concrete off to the pegs.
Using a wooden float, smooth the surface of the concrete to achieve a consistent mortar finish, which will ensure the concrete is well compacted.
The footing should be covered with plastic and left to cure for at least seven days before any brickwork can commence. See “Laying A Concrete Slab” for more information.
-
6
Pergola and Fence Posts
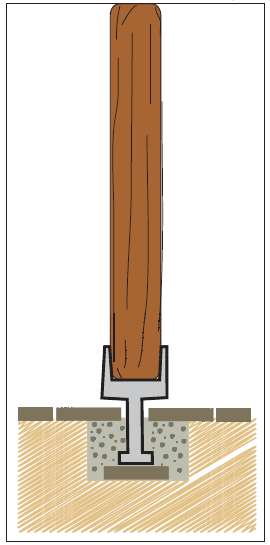
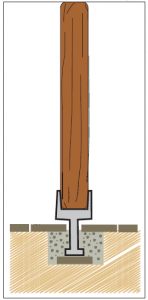 Excavate a hole for your post and ensure that there is a clearance of 50 to 80mm between your post and the hole sides. For posts which will be placed in the ground, ensure you dig the hole deep enough so that 25% of the post is in the ground to achieve sufficient strength. Alternatively you can purchase a post shoe or metal stirrup which is specifically designed for posts.
Thoroughly saturate the hole (as per instructions on the bag) and without delay pour the correct quantity of concrete into the hole. Mix thoroughly. The concrete must be compacted by ramming down with your boot or similar sized object.
The post then needs to be supported using a timber brace until the concrete has hardened.
Posts freshly set into concrete can be forced into a new position for up to 20 minutes after the concrete pour.
Your posts should be left to stand for at least three days before any braces are removed and before anything can be attached to them.